Using Google-Managed Certificates and Identity-Aware Proxy With GKE

Ingress on Google Kubernetes Engine (GKE) uses a Google Cloud Load Balancer (GCLB). GCLB provides a single anycast IP that fronts all of your backend compute instances along with a lot of other rich features. In order to create a GCLB that uses HTTPS, an SSL certificate needs to be associated with the ingress resource. This certificate can either be self-managed or Google-managed. The benefit of using a Google-managed certificate is that they are provisioned, renewed, and managed for your domain names by Google. These managed certificates can also be configured directly with GKE, meaning we can configure our certificates the same way we declaratively configure our other Kubernetes resources such as deployments, services, and ingresses.

GKE also supports Identity-Aware Proxy (IAP), which is a fully managed solution for implementing a zero-trust security model for applications and VMs. With IAP, we can secure workloads in GCP using identity and context. For example, this might be based on attributes like user identity, device security status, region, or IP address. This allows users to access applications securely from untrusted networks without the need for a VPN. IAP is a powerful way to implement authentication and authorization for corporate applications that are run internally on GKE, Google Compute Engine (GCE), or App Engine. This might be applications such as Jira, GitLab, Jenkins, or production-support portals.

IAP works in relation to GCLB in order to secure GKE workloads. In this tutorial, I’ll walk through deploying a workload to a GKE cluster, setting up GCLB ingress for it with a global static IP address, configuring a Google-managed SSL certificate to support HTTPS traffic, and enabling IAP to secure access to the application. In order to follow along, you’ll need a GKE cluster and domain name to use for the application. In case you want to skip ahead, all of the Kubernetes configuration for this tutorial is available here.

Deploying an Application Behind GCLB With a Managed Certificate

First, let’s deploy our application to GKE. We’ll use a Hello World application to test this out. Our application will consist of a Kubernetes deployment and service. Below is the configuration for these:

Apply these with kubectl:

$ kubectl apply -f .

At this point, our application is not yet accessible from outside the cluster since we haven’t set up an ingress. Before we do that, we need to create a static IP address using the following command:

$ gcloud compute addresses create web-static-ip --global

The above will reserve a static external IP called “web-static-ip.” We now can create an ingress resource using this IP address. Note the “kubernetes.io/ingress.global-static-ip-name” annotation in the configuration:

Applying this with kubectl will provision a GCLB that will route traffic into our service. It can take a few minutes for the load balancer to become active and health checks to begin working. Traffic won’t be served until that happens, so use the following command to check that traffic is healthy:

$ curl -i http://<web-static-ip>

You can find <web-static-ip> with:

$ gcloud compute addresses describe web-static-ip --global

Once you start getting a successful response, update your DNS to point your domain name to the static IP address. Wait until the DNS change is propagated and your domain name now points to the application running in GKE. This could take 30 minutes or so.

After DNS has been updated, we’ll configure HTTPS. To do this, we need to create a Google-managed SSL certificate. This can be managed by GKE using the following configuration:

Ensure that “example.com” is replaced with the domain name you’re using.

We now need to update our ingress to use the new managed certificate. This is done using the “networking.gke.io/managed-certificates” annotation.

We’ll need to wait a bit for the certificate to finish provisioning. This can take up to 15 minutes. Once it’s done, we should see HTTPS traffic flowing correctly:

$ curl -i https://example.com

We now have a working example of an application running in GKE behind a GCLB with a static IP address and domain name secured with TLS. Now we’ll finish up by enabling IAP to control access to the application.

Securing the Application With Identity-Aware Proxy

If you’re enabling IAP for the first time, you’ll need to configure your project’s OAuth consent screen. The steps here will walk through how to do that. This consent screen is what users will see when they attempt to access the application before logging in.

Once IAP is enabled and the OAuth consent screen has been configured, there should be an OAuth 2 client ID created in your GCP project. You can find this under “OAuth 2.0 Client IDs” in the “APIs & Services” > “Credentials” section of the cloud console. When you click on this credential, you’ll find a client ID and client secret. These need to be provided to Kubernetes as secrets so they can be used by a BackendConfig for configuring IAP. Apply the secrets to Kubernetes with the following command, replacing “xxx” with the respective credentials:

$ kubectl create secret generic iap-oauth-client-id \
--from-literal=client_id=xxx \
--from-literal=client_secret=xxx

BackendConfig is a Kubernetes custom resource used to configure ingress in GKE. This includes features such as IAP, Cloud CDN, Cloud Armor, and others. Apply the following BackendConfig configuration using kubectl, which will enable IAP and associate it with your OAuth client credentials:

We also need to ensure there are service ports associated with the BackendConfig in order to trigger turning on IAP. One way to do this is to make all ports for the service default to the BackendConfig, which is done by setting the “beta.cloud.google.com/backend-config” annotation to “{“default”: “config-default”}” in the service resource. See below for the updated service configuration.

Once you’ve applied the annotation to the service, wait a couple minutes for the infrastructure to settle. IAP should now be working. You’ll need to assign the “IAP-secured Web App User” role in IAP to any users or groups who should have access to the application. Upon accessing the application, you should now be greeted with a login screen.
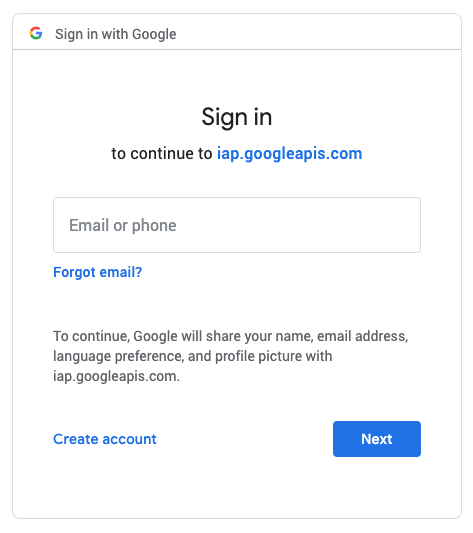
Your Kubernetes workload is now secured by IAP! Do note that VPC firewall rules can be configured to bypass IAP, such as rules that allow traffic internal to your VPC or GKE cluster. IAP will provide a warning indicating which firewall rules allow bypassing it.
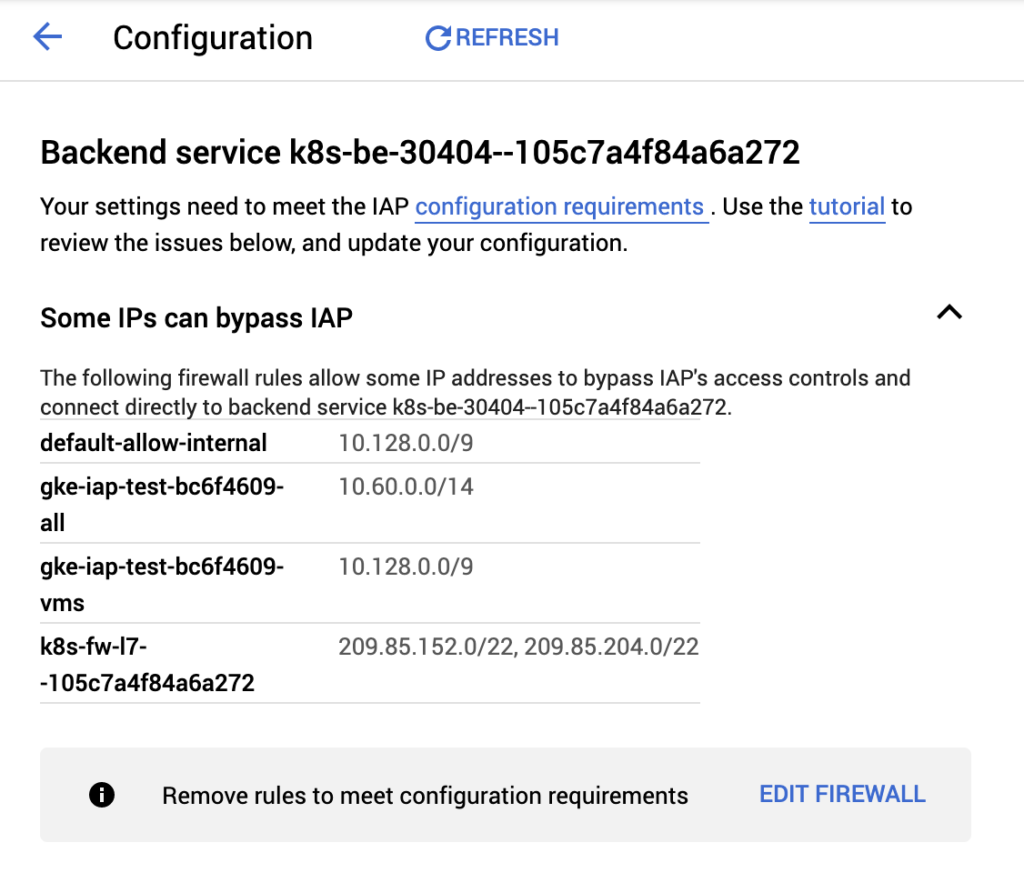
For an extra layer of security, IAP sets signed headers on inbound requests which can be verified by the application. This is helpful in the event that IAP is accidentally disabled or misconfigured or if firewall rules are improperly set.

Together with GCLB and GCP-managed certificates, IAP provides a great solution for serving and securing internal applications that can be accessed anywhere without the need for a VPN.

Zero-Trust Security on GCP With Context-Aware Access

A lot of our clients at Real Kinetic leverage serverless on GCP to quickly build applications with minimal operations overhead. Serverless is one of the things that truly differentiates GCP from other cloud providers, and App Engine is a big component of this. Many of these companies come from an on-prem world and, as a result, tend to favor perimeter-based security models. They rely heavily on things like IP and network restrictions, VPNs, corporate intranets, and so forth. Unfortunately, this type of security model doesn’t always fit nicely with serverless due to the elastic and dynamic nature of serverless systems.

Recently, I worked with a client who was building an application for internal support staff on App Engine. They were using Identity-Aware Proxy (IAP) to authenticate users and authorize access to the application. IAP provides a fully managed solution for implementing a zero-trust access model for App Engine and Compute Engine. In this case, their G Suite user directory was backed by Active Directory, which allowed them to manage access to the application using Single Sign-On and AD groups.

Everything was great until the team hit a bit of a snag when they went through their application vulnerability assessment. Because it was for internal users, the security team requested the application be restricted to the corporate network. While I’m deeply skeptical of the value this adds in terms of security—the application was already protected by SSO and two-factor authentication and IAP cannot be bypassed with App Engine—I shared my concerns and started evaluating options. Sometimes that’s just the way things go in a larger, older organization. Culture shifts are hard and take time.

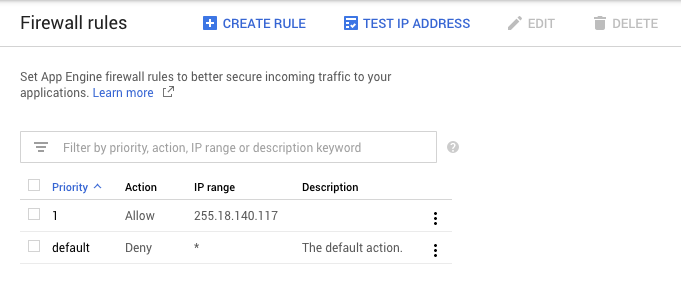
App Engine has firewall rules built in which allow you to secure incoming traffic to your application with allow/deny rules based on IP, so it seemed like an easy fix. The team would be in production in no time!

App Engine firewall rules

Unfortunately, there are some issues with how these firewall rules work depending on the application architecture. All traffic to App Engine goes through Google Front End (GFE) servers. This provides numerous benefits including TLS termination, DDoS protection, DNS, load balancing, firewall, and integration with IAP. It can present problems, however, if you have multiple App Engine services that communicate with each other internally. For example, imagine you have a frontend service which talks to a backend service.

App Engine does not provide a static IP address and instead relies on a large, dynamic pool of IP addresses. Two sequential outbound calls from the same application can appear to originate from two different IP addresses. One option is to allow all possible App Engine IPs, but this is riddled with issues. For one, Google uses netblocks that dynamically change and are encoded in Sender Policy Framework (SPF) records. To determine all of the IPs App Engine is currently using, you need to recursively perform DNS lookups by fetching the current set of netblocks and then doing a DNS lookup for each netblock. These results are not static, meaning you would need to do the lookups and update firewall rules continually. Worse yet, allowing all possible App Engine IPs would be self-defeating since it would be trivial for an attacker to work around by setting up their own App Engine application to gain access, assuming there isn’t any additional security beyond the firewall.

Another, slightly better option is to set up a proxy on Compute Engine in the same region as your App Engine application. With this, you get a static IP address. The downside here is that it’s an additional piece of infrastructure that must be managed, which isn’t great when you’re shooting for a serverless architecture.

Luckily, there is a better solution—one that fits our serverless model and enables us to control external traffic while allowing App Engine services to securely communicate internally. IAP supports context-aware access, which allows enforcing granular access controls for web applications, VMs, and GCP APIs based on an end-user’s identity and request context. Essentially, context-aware access brings a richer zero-trust model to App Engine and other GCP services.

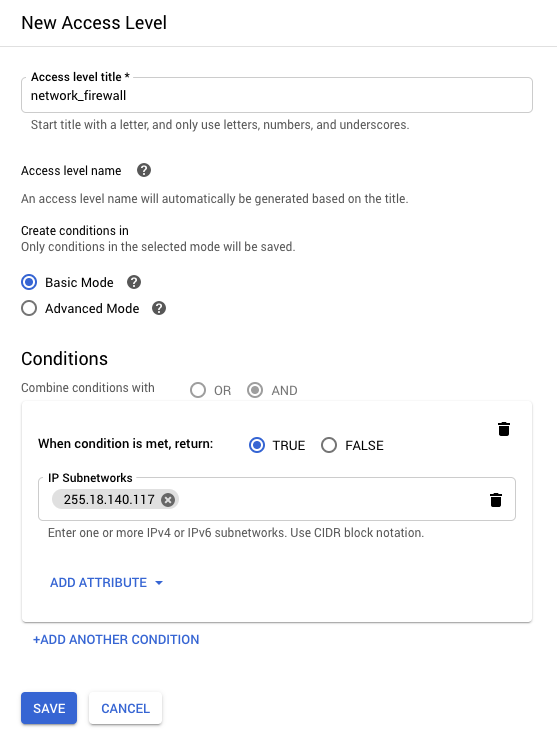
To set up a network firewall in IAP, we first need to create an Access Level in the Access Context Manager. Access Levels are a way to add an extra level of security based on request attributes such as IP address, region, time of day, or device. In the client’s case, they can create an Access Level to only allow access from their corporate network.

GCP Access Context Manager

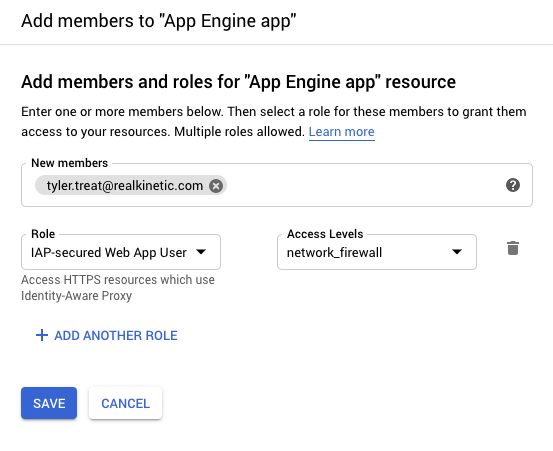
We can then add the Access Level to roles that are assigned to users or groups in IAP. This means even if users are authenticated, they must be on the corporate network to access the application.

Cloud Identity-Aware Proxy roles

To allow App Engine services to communicate freely, we simply need to assign the IAP-secured Web App User role without the Access Level to the App Engine default service account. Services will then authenticate as usual using OpenID Connect without the added network restriction. The default service account is managed by GCP and there are no associated credentials, so this provides a solid security posture.

Now, at this point, we’ve solved the IP firewall problem, but that’s not really in the spirit of zero-trust, right? Zero-trust is a security principle believing that organizations should not inherently trust anything inside or outside of their perimeters and instead should verify anything trying to connect to their systems. Having to connect to a VPN in order to access an application in the cloud is kind of a bummer, especially when the corporate VPN goes down. COVID-19 has made a lot of organizations feel this pain. Fortunately, Access Levels can be a lot smarter than providing simple lists of approved IP addresses. With the Cloud IAM Conditions Framework, we can even write custom rules to allow access based on URL path, resource type, or other request attributes.

At this point, I talked the client through the Endpoint Verification process and how we can shift away from a perimeter-based security model to a defense-in-depth, zero-trust model. Rather than requiring the end-user to be signed in from the corporate network, we can require them to be signed in from a trusted, corporate-owned device from anywhere. We can require that the device has a screen lock and is encrypted or has a minimum OS version.

With IAP and context-aware access, we can build layered security on top of applications and resources without the need for a VPN, while still centrally managing access. This can even extend beyond GCP to applications hosted on-prem or in other cloud platforms like AWS and Azure. Enterprises don’t have to move away from more traditional security models all at once. This pattern allows you to gradually shift by adding and removing Access Levels and attributes over time. Zero-trust becomes much easier to implement within large organizations when they don’t have to flip a switch.