Using Google-Managed Certificates and Identity-Aware Proxy With GKE

Ingress on Google Kubernetes Engine (GKE) uses a Google Cloud Load Balancer (GCLB). GCLB provides a single anycast IP that fronts all of your backend compute instances along with a lot of other rich features. In order to create a GCLB that uses HTTPS, an SSL certificate needs to be associated with the ingress resource. This certificate can either be self-managed or Google-managed. The benefit of using a Google-managed certificate is that they are provisioned, renewed, and managed for your domain names by Google. These managed certificates can also be configured directly with GKE, meaning we can configure our certificates the same way we declaratively configure our other Kubernetes resources such as deployments, services, and ingresses.

GKE also supports Identity-Aware Proxy (IAP), which is a fully managed solution for implementing a zero-trust security model for applications and VMs. With IAP, we can secure workloads in GCP using identity and context. For example, this might be based on attributes like user identity, device security status, region, or IP address. This allows users to access applications securely from untrusted networks without the need for a VPN. IAP is a powerful way to implement authentication and authorization for corporate applications that are run internally on GKE, Google Compute Engine (GCE), or App Engine. This might be applications such as Jira, GitLab, Jenkins, or production-support portals.

IAP works in relation to GCLB in order to secure GKE workloads. In this tutorial, I’ll walk through deploying a workload to a GKE cluster, setting up GCLB ingress for it with a global static IP address, configuring a Google-managed SSL certificate to support HTTPS traffic, and enabling IAP to secure access to the application. In order to follow along, you’ll need a GKE cluster and domain name to use for the application. In case you want to skip ahead, all of the Kubernetes configuration for this tutorial is available here.

Deploying an Application Behind GCLB With a Managed Certificate

First, let’s deploy our application to GKE. We’ll use a Hello World application to test this out. Our application will consist of a Kubernetes deployment and service. Below is the configuration for these:

Apply these with kubectl:

$ kubectl apply -f .

At this point, our application is not yet accessible from outside the cluster since we haven’t set up an ingress. Before we do that, we need to create a static IP address using the following command:

$ gcloud compute addresses create web-static-ip --global

The above will reserve a static external IP called “web-static-ip.” We now can create an ingress resource using this IP address. Note the “kubernetes.io/ingress.global-static-ip-name” annotation in the configuration:

Applying this with kubectl will provision a GCLB that will route traffic into our service. It can take a few minutes for the load balancer to become active and health checks to begin working. Traffic won’t be served until that happens, so use the following command to check that traffic is healthy:

$ curl -i http://<web-static-ip>

You can find <web-static-ip> with:

$ gcloud compute addresses describe web-static-ip --global

Once you start getting a successful response, update your DNS to point your domain name to the static IP address. Wait until the DNS change is propagated and your domain name now points to the application running in GKE. This could take 30 minutes or so.

After DNS has been updated, we’ll configure HTTPS. To do this, we need to create a Google-managed SSL certificate. This can be managed by GKE using the following configuration:

Ensure that “example.com” is replaced with the domain name you’re using.

We now need to update our ingress to use the new managed certificate. This is done using the “networking.gke.io/managed-certificates” annotation.

We’ll need to wait a bit for the certificate to finish provisioning. This can take up to 15 minutes. Once it’s done, we should see HTTPS traffic flowing correctly:

$ curl -i https://example.com

We now have a working example of an application running in GKE behind a GCLB with a static IP address and domain name secured with TLS. Now we’ll finish up by enabling IAP to control access to the application.

Securing the Application With Identity-Aware Proxy

If you’re enabling IAP for the first time, you’ll need to configure your project’s OAuth consent screen. The steps here will walk through how to do that. This consent screen is what users will see when they attempt to access the application before logging in.

Once IAP is enabled and the OAuth consent screen has been configured, there should be an OAuth 2 client ID created in your GCP project. You can find this under “OAuth 2.0 Client IDs” in the “APIs & Services” > “Credentials” section of the cloud console. When you click on this credential, you’ll find a client ID and client secret. These need to be provided to Kubernetes as secrets so they can be used by a BackendConfig for configuring IAP. Apply the secrets to Kubernetes with the following command, replacing “xxx” with the respective credentials:

$ kubectl create secret generic iap-oauth-client-id \
--from-literal=client_id=xxx \
--from-literal=client_secret=xxx

BackendConfig is a Kubernetes custom resource used to configure ingress in GKE. This includes features such as IAP, Cloud CDN, Cloud Armor, and others. Apply the following BackendConfig configuration using kubectl, which will enable IAP and associate it with your OAuth client credentials:

We also need to ensure there are service ports associated with the BackendConfig in order to trigger turning on IAP. One way to do this is to make all ports for the service default to the BackendConfig, which is done by setting the “beta.cloud.google.com/backend-config” annotation to “{“default”: “config-default”}” in the service resource. See below for the updated service configuration.

Once you’ve applied the annotation to the service, wait a couple minutes for the infrastructure to settle. IAP should now be working. You’ll need to assign the “IAP-secured Web App User” role in IAP to any users or groups who should have access to the application. Upon accessing the application, you should now be greeted with a login screen.
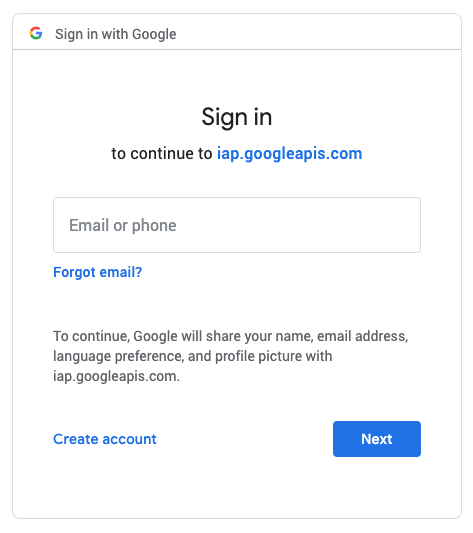
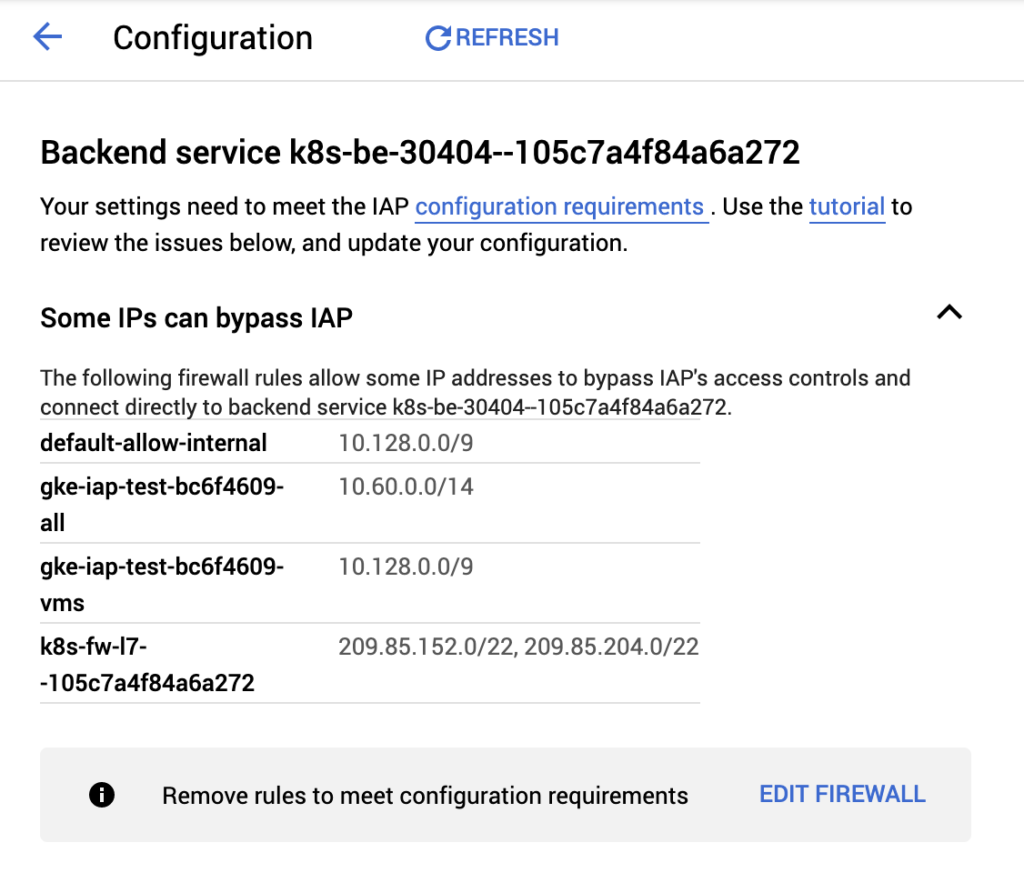
Your Kubernetes workload is now secured by IAP! Do note that VPC firewall rules can be configured to bypass IAP, such as rules that allow traffic internal to your VPC or GKE cluster. IAP will provide a warning indicating which firewall rules allow bypassing it.
For an extra layer of security, IAP sets signed headers on inbound requests which can be verified by the application. This is helpful in the event that IAP is accidentally disabled or misconfigured or if firewall rules are improperly set.

Together with GCLB and GCP-managed certificates, IAP provides a great solution for serving and securing internal applications that can be accessed anywhere without the need for a VPN.

Zero-Trust Security on GCP With Context-Aware Access

A lot of our clients at Real Kinetic leverage serverless on GCP to quickly build applications with minimal operations overhead. Serverless is one of the things that truly differentiates GCP from other cloud providers, and App Engine is a big component of this. Many of these companies come from an on-prem world and, as a result, tend to favor perimeter-based security models. They rely heavily on things like IP and network restrictions, VPNs, corporate intranets, and so forth. Unfortunately, this type of security model doesn’t always fit nicely with serverless due to the elastic and dynamic nature of serverless systems.

Recently, I worked with a client who was building an application for internal support staff on App Engine. They were using Identity-Aware Proxy (IAP) to authenticate users and authorize access to the application. IAP provides a fully managed solution for implementing a zero-trust access model for App Engine and Compute Engine. In this case, their G Suite user directory was backed by Active Directory, which allowed them to manage access to the application using Single Sign-On and AD groups.

Everything was great until the team hit a bit of a snag when they went through their application vulnerability assessment. Because it was for internal users, the security team requested the application be restricted to the corporate network. While I’m deeply skeptical of the value this adds in terms of security—the application was already protected by SSO and two-factor authentication and IAP cannot be bypassed with App Engine—I shared my concerns and started evaluating options. Sometimes that’s just the way things go in a larger, older organization. Culture shifts are hard and take time.

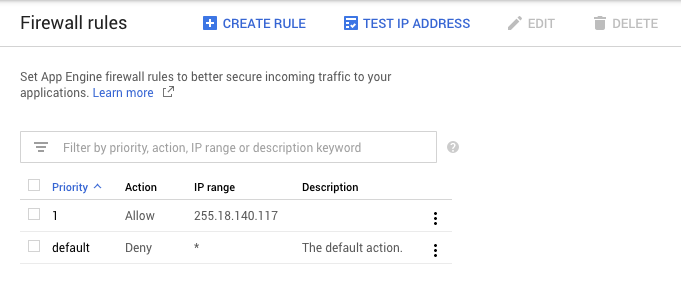
App Engine has firewall rules built in which allow you to secure incoming traffic to your application with allow/deny rules based on IP, so it seemed like an easy fix. The team would be in production in no time!

App Engine firewall rules

Unfortunately, there are some issues with how these firewall rules work depending on the application architecture. All traffic to App Engine goes through Google Front End (GFE) servers. This provides numerous benefits including TLS termination, DDoS protection, DNS, load balancing, firewall, and integration with IAP. It can present problems, however, if you have multiple App Engine services that communicate with each other internally. For example, imagine you have a frontend service which talks to a backend service.

App Engine does not provide a static IP address and instead relies on a large, dynamic pool of IP addresses. Two sequential outbound calls from the same application can appear to originate from two different IP addresses. One option is to allow all possible App Engine IPs, but this is riddled with issues. For one, Google uses netblocks that dynamically change and are encoded in Sender Policy Framework (SPF) records. To determine all of the IPs App Engine is currently using, you need to recursively perform DNS lookups by fetching the current set of netblocks and then doing a DNS lookup for each netblock. These results are not static, meaning you would need to do the lookups and update firewall rules continually. Worse yet, allowing all possible App Engine IPs would be self-defeating since it would be trivial for an attacker to work around by setting up their own App Engine application to gain access, assuming there isn’t any additional security beyond the firewall.

Another, slightly better option is to set up a proxy on Compute Engine in the same region as your App Engine application. With this, you get a static IP address. The downside here is that it’s an additional piece of infrastructure that must be managed, which isn’t great when you’re shooting for a serverless architecture.

Luckily, there is a better solution—one that fits our serverless model and enables us to control external traffic while allowing App Engine services to securely communicate internally. IAP supports context-aware access, which allows enforcing granular access controls for web applications, VMs, and GCP APIs based on an end-user’s identity and request context. Essentially, context-aware access brings a richer zero-trust model to App Engine and other GCP services.

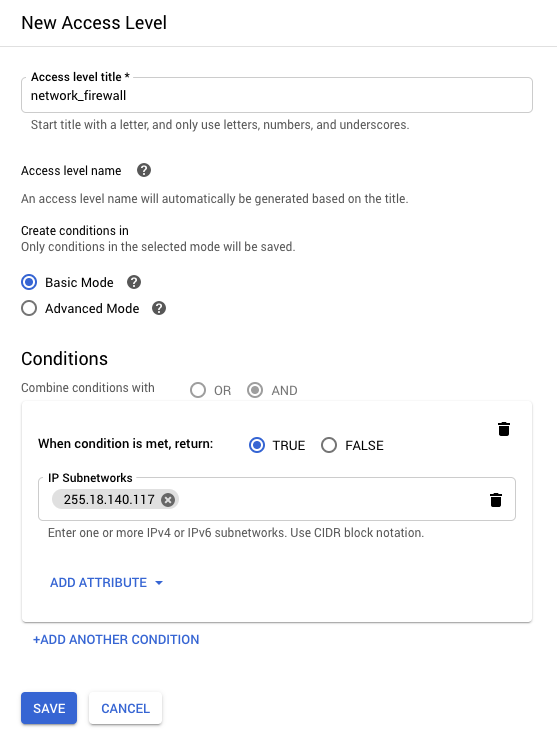
To set up a network firewall in IAP, we first need to create an Access Level in the Access Context Manager. Access Levels are a way to add an extra level of security based on request attributes such as IP address, region, time of day, or device. In the client’s case, they can create an Access Level to only allow access from their corporate network.

GCP Access Context Manager

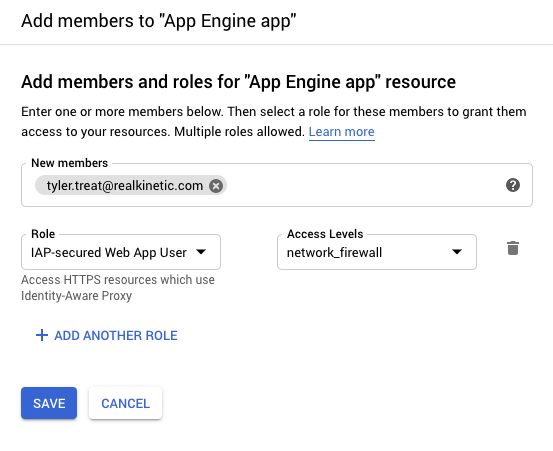
We can then add the Access Level to roles that are assigned to users or groups in IAP. This means even if users are authenticated, they must be on the corporate network to access the application.

Cloud Identity-Aware Proxy roles

To allow App Engine services to communicate freely, we simply need to assign the IAP-secured Web App User role without the Access Level to the App Engine default service account. Services will then authenticate as usual using OpenID Connect without the added network restriction. The default service account is managed by GCP and there are no associated credentials, so this provides a solid security posture.

Now, at this point, we’ve solved the IP firewall problem, but that’s not really in the spirit of zero-trust, right? Zero-trust is a security principle believing that organizations should not inherently trust anything inside or outside of their perimeters and instead should verify anything trying to connect to their systems. Having to connect to a VPN in order to access an application in the cloud is kind of a bummer, especially when the corporate VPN goes down. COVID-19 has made a lot of organizations feel this pain. Fortunately, Access Levels can be a lot smarter than providing simple lists of approved IP addresses. With the Cloud IAM Conditions Framework, we can even write custom rules to allow access based on URL path, resource type, or other request attributes.

At this point, I talked the client through the Endpoint Verification process and how we can shift away from a perimeter-based security model to a defense-in-depth, zero-trust model. Rather than requiring the end-user to be signed in from the corporate network, we can require them to be signed in from a trusted, corporate-owned device from anywhere. We can require that the device has a screen lock and is encrypted or has a minimum OS version.

With IAP and context-aware access, we can build layered security on top of applications and resources without the need for a VPN, while still centrally managing access. This can even extend beyond GCP to applications hosted on-prem or in other cloud platforms like AWS and Azure. Enterprises don’t have to move away from more traditional security models all at once. This pattern allows you to gradually shift by adding and removing Access Levels and attributes over time. Zero-trust becomes much easier to implement within large organizations when they don’t have to flip a switch.

Authenticating Stackdriver Uptime Checks for Identity-Aware Proxy

Google Stackdriver provides a set of tools for monitoring and managing services running in GCP, AWS, or on-prem infrastructure. One feature Stackdriver has is “uptime checks,” which enable you to verify the availability of your service and track response latencies over time from up to six different geographic locations around the world. While Stackdriver uptime checks are not as feature-rich as other similar products such as Pingdom, they are also completely free. For GCP users, this provides a great starting point for quickly setting up health checks and alerting for your applications.

Last week I looked at implementing authentication and authorization for APIs in GCP using Cloud Identity-Aware Proxy (IAP). IAP provides an easy way to implement identity and access management (IAM) for applications and APIs in a centralized place. However, one thing you will bump into when using Stackdriver uptime checks in combination with IAP is authentication. For App Engine in particular, this can be a problem since there is no way to bypass IAP. All traffic, both internal and external to GCP, goes through it. Until Cloud IAM Conditions is released and generally available, there’s no way to—for example—open up a health-check endpoint with IAP.

While uptime checks have support for Basic HTTP authentication, there is no way to script more sophisticated request flows (e.g. to implement the OpenID Connect (OIDC) authentication flow for IAP-protected resources) or implement fine-grained IAM policies (as hinted at above, this is coming with IAP Context-Aware Access and IAM Conditions). So are we relegated to using Nagios or some other more complicated monitoring tool? Not necessarily. In this post, I’ll present a workaround solution for authenticating Stackdriver uptime checks for systems protected by IAP using Google Cloud Functions.

The Solution

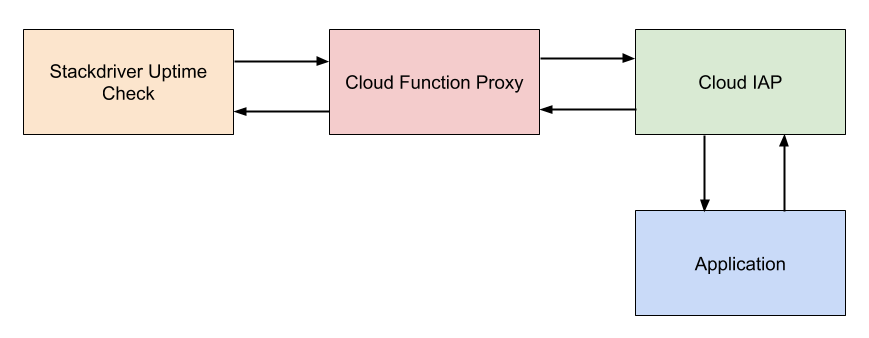
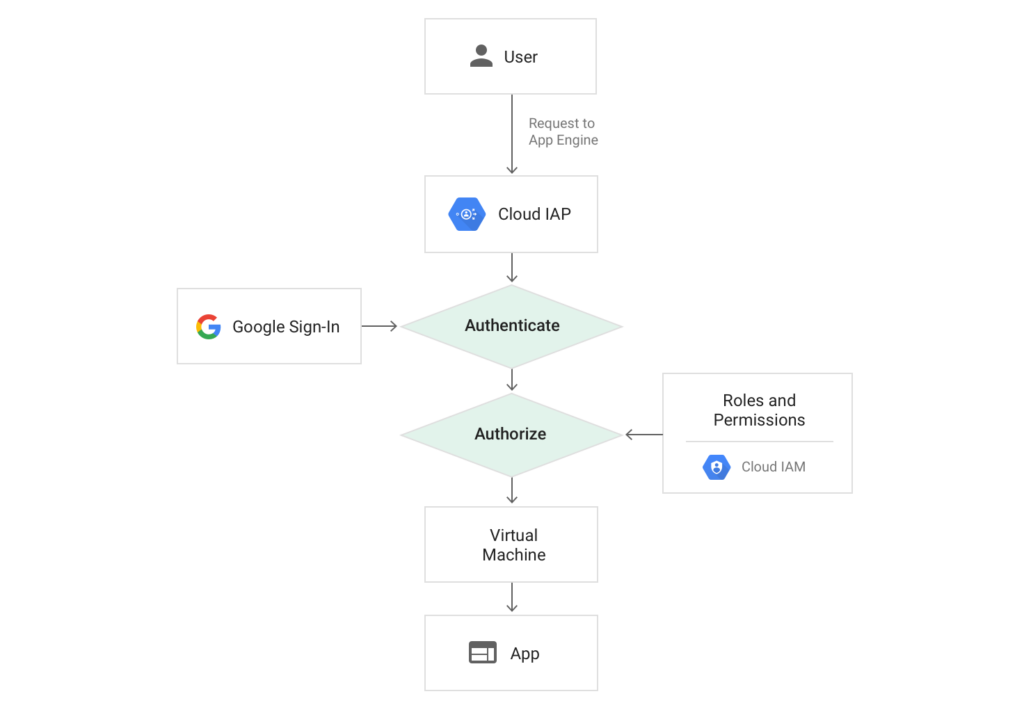
The general strategy is to use a Cloud Function which can authenticate with IAP using a service account to proxy uptime checks to the application. Essentially, the proxy takes a request from a client, looks for a header containing a host, forwards the request that host after performing the necessary authentication, and then forwards the response back to the client. The general architecture of this is shown below.

There are some trade-offs with this approach. The benefit is we get to rely on health checks that are fully managed by GCP and free of charge. Since Cloud Functions are also managed by GCP, there’s no operations involved beyond deploying the proxy and setting it up. The first two million invocations per month are free for Cloud Functions. If we have an uptime check running every five minutes from six different locations, that’s approximately 52,560 invocations per month. This means we could run roughly 38 different uptime checks without exceeding the free tier for invocations. In addition to invocations, the free tier offers 400,000 GB-seconds, 200,000 GHz-seconds of compute time and 5GB of Internet egress traffic per month. Using the GCP pricing calculator, we can estimate the cost for our uptime check. It generally won’t come close to exceeding the free tier.

The downside to this approach is the check is no longer validating availability from the perspective of an end user. Because the actual service request is originating from Google’s infrastructure by way of a Cloud Function as opposed to Stackdriver itself, it’s not quite the same as a true end-to-end check. That said, both Cloud Functions and App Engine rely on the same Google Front End (GFE) infrastructure, so as long as both the proxy and App Engine application are located in the same region, this is probably not all that important. Besides, for App Engine at least, the value of the uptime check is really more around performing a full-stack probe of the application and its dependencies than monitoring the health of Google’s own infrastructure. That is one of the goals behind using managed services after all. The bigger downside is that the latency reported by the uptime check no longer accurately represents the application. It can still be useful for monitoring aggregate trends nonetheless.

The Implementation Setup

I’ve built an open-source implementation of the proxy as a Cloud Function in Python called gcp-oidc-proxy. It’s runnable out of the box without any modification. We’ll assume you have an IAP-protected application you want to setup a Stackdriver uptime check for. To deploy the proxy Cloud Function, first clone the repository to your machine, then from there run the following gcloud command:

$ gcloud functions deploy gcp-oidc-proxy \
   --runtime python37 \
   --entry-point handle_request \
   --trigger-http

This will deploy a new Cloud Function called gcp-oidc-proxy to your configured cloud project. It will assume the project’s default service account. Ordinarily, I would suggest creating a separate service account to limit scopes. This can be configured on the Cloud Function with the –service-account flag, which is under gcloud beta functions deploy at the time of this writing. We’ll omit this step for brevity however.

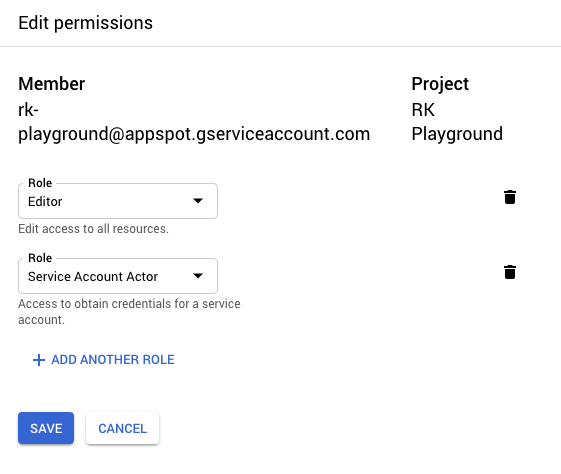
Next, we need to add the “Service Account Actor” IAM role to the Cloud Function’s service account since it will need it to sign JWTs (more on this later). In the GCP console, go to IAM & admin, locate the appropriate service account (in this case, the default service account), and add the respective role.

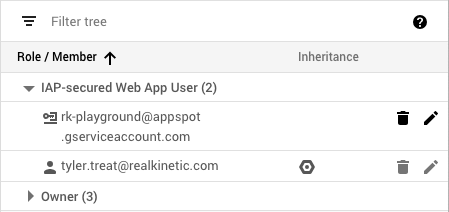
The Cloud Function’s service account must also be added as a member to the IAP with the “IAP-secured Web App User” role in order to properly authenticate. Navigate to Identity-Aware Proxy in the GCP console, select the resource you wish to add the service account to, then click Add Member.

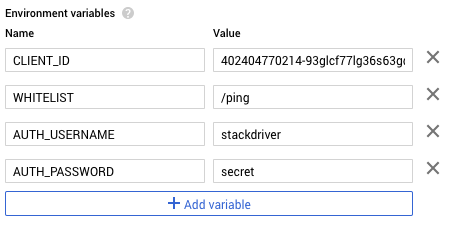
Find the OAuth2 client ID for the IAP by clicking on the options menu next to the IAP resource and select “Edit OAuth client.” Copy the client ID on the next page and then navigate to the newly deployed gcp-oidc-proxy Cloud Function. We need to configure a few environment variables, so click edit and then expand more at the bottom of the page. We’ll add four environment variables: CLIENT_ID, WHITELIST, AUTH_USERNAME, and AUTH_PASSWORD.

CLIENT_ID contains the OAuth2 client ID we copied for the IAP. WHITELIST contains a comma-separated list of URL paths to make accessible or * for everything (I’m using /ping in my example application), and AUTH_USERNAME and AUTH_PASSWORD setup Basic authentication for the Cloud Function. If these are omitted, authentication is disabled.

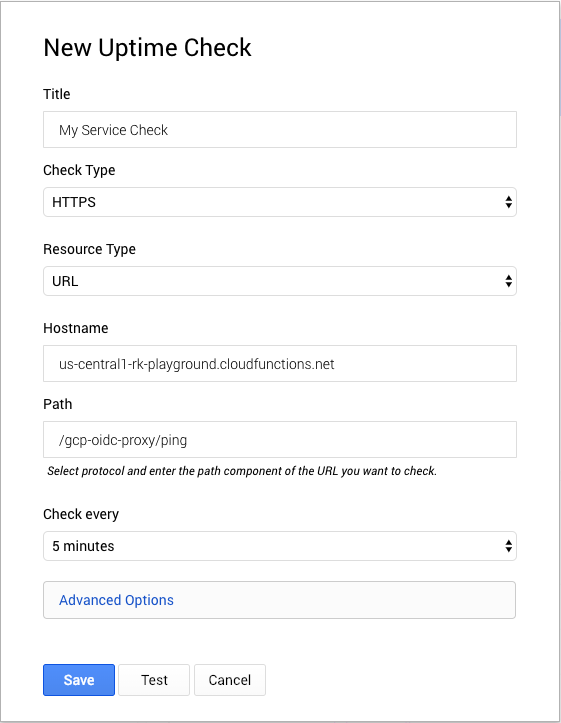
Save the changes to redeploy the function with the new environment variables. Next, we’ll setup a Stackdriver uptime check that uses the proxy to call our service. In the GCP console, navigate to Monitoring then Create Check from the Stackdriver UI. Skip any suggestions for creating a new uptime check. For the hostname, use the Cloud Function host. For the path, use /gcp-oidc/proxy/<your-endpoint>. The proxy will use the path to make a request to the protected resource.

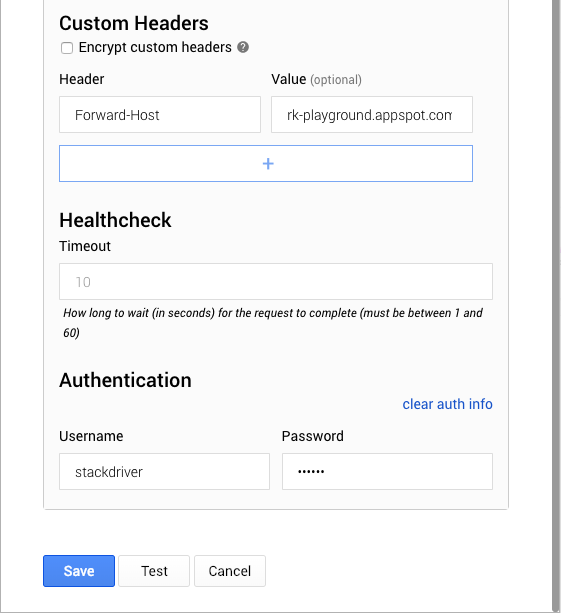
Expand Advanced Options to set the Forward-Host to the host protected by IAP. The proxy uses this header to forward requests. Lastly, we’ll set the authentication username and password that we configured on the Cloud Function.

Click “Test” to ensure our configuration works and the check passes.

The Implementation Details

The remainder of this post will walk you through the implementation details of the proxy. The implementation closely resembles what we did to authenticate API consumers using a service account. We use a header called Forward-Host to allow the client to specify the IAP-authenticated host to forward requests to. If the header is not present, we just return a 400 error. We then use this host and the path of the original request to construct the proxy request and retain the HTTP method and headers (with the exception of the Host header, if present, since this can cause problems).

Before sending the request, we perform the authentication process by generating a JWT signed by the service account and exchange it for a Google-signed OIDC token.

We can cache this token and renew it only once it expires. Then we set the Authorization header with the OIDC token and send the request.

We simply forward on the resulting content body, status code, and headers. We strip HTTP/1.1 “hop-by-hop” headers since these are unsupported by WSGI and Python Cloud Functions rely on Flask. We also strip any Content-Encoding header since this can also cause problems.

Because this proxy allows clients to call into endpoints unauthenticated, we also implement a whitelist to expose only certain endpoints. The whitelist is a list of allowed paths passed in from an environment variable. Alternatively, we can whitelist * to allow all paths. Wildcarding could be implemented to make this even more flexible. We also implement a Basic auth decorator which is configured with environment variables since we can setup uptime checks with a username and password in Stackdriver.

The only other code worth looking at in detail is how we setup the service account credentials and IAM Signer. A Cloud Function has a service account attached to it which allows it to assume the roles of that account. Cloud Functions rely on the Google Compute Engine metadata server which stores service account information among other things. However, the metadata server doesn’t expose the service account key used to sign the JWT, so instead we must use the IAM signBlob API to sign JWTs.

Conclusion

It’s not a particularly simple solution, but it gets the job done. The setup of the Cloud Function could definitely be scripted as well. Once IAM Conditions is generally available, it should be possible to expose certain endpoints in a way that is accessible to Stackdriver without the need for the OIDC proxy. That said, it’s not clear if there is a way to implement uptime checks without exposing an endpoint at all since there is currently no way to assign a service account to a check. Ideally, we would be able to assign a service account and use that with IAP Context-Aware Access to allow the uptime check to access protected endpoints.

API Authentication with GCP Identity-Aware Proxy

Cloud Identity-Aware Proxy (Cloud IAP) is a free service which can be used to implement authentication and authorization for applications running in Google Cloud Platform (GCP). This includes Google App Engine applications as well as workloads running on Compute Engine (GCE) VMs and Google Kubernetes Engine (GKE) by way of Google Cloud Load Balancers.

When enabled, IAP requires users accessing a web application to login using their Google account and ensure they have the appropriate role to access the resource. This can be used to provide secure access to web applications without the need for a VPN. This is part of what Google now calls BeyondCorp, which is an enterprise security model designed to enable employees to work from untrusted networks without a VPN. At Real Kinetic, we frequently bump into companies practicing Death-Star security, which is basically relying on a hard outer shell to protect a soft, gooey interior. It’s simple and easy to administer, but it’s also vulnerable. That’s why we always approach security from a perspective of defense in depth.

However, in this post I want to explore how we can use Cloud IAP to implement authentication and authorization for APIs in GCP. Specifically, I will use App Engine, but the same applies to resources behind an HTTPS load balancer. The goal is to provide a way to securely expose APIs in GCP which can be accessed programmatically.

Configuring Identity-Aware Proxy

Cloud IAP supports authenticating service accounts using OpenID Connect (OIDC). A service account belongs to an application instead of an individual user. You authenticate a service account when you want to allow an application to access your IAP-secured resources. A GCP service account can either have GCP-managed keys (for systems that reside within GCP) or user-managed keys (for systems that reside outside of GCP). GCP-managed keys cannot be downloaded and are automatically rotated and used for signing for a maximum of two weeks. User-managed keys are created, downloaded, and managed by users and expire 10 years from creation. As such, key rotation must be managed by the user as appropriate. In either case, access using a service account can be revoked either by revoking a particular key or removing the service account itself.

An IAP is associated with an App Engine application or HTTPS Load Balancer. One or more service accounts can then be added to an IAP to allow programmatic authentication. When the IAP is off, the resource is accessible to anyone with the URL. When it’s on, it’s only accessible to members who have been granted access. This can include specific Google accounts, groups, service accounts, or a general G Suite domain.

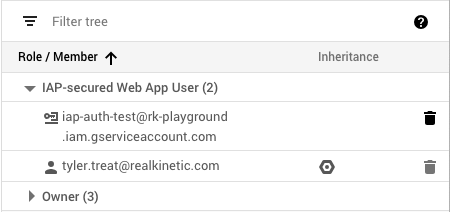
IAP will create an OAuth2 client ID for OIDC authentication which can be used by service accounts. But in order to access our API using a service account, we first need to add it to IAP with the appropriate role. We’ll add it as an IAP-secured Web App User, which allows access to HTTPS resources protected by IAP. In this case, my service account is called “IAP Auth Test,” and the email associated with it is iap-auth-test@rk-playground.iam.gserviceaccount.com.

As you can see, both the service account and my user account are IAP-secured Web App Users. This means I can access the application using my Google login or using the service account credentials. Next, we’ll look at how to properly authenticate using the service account.

Authenticating API Consumers

When you create a service account key in the GCP console, it downloads a JSON credentials file to your machine. The API consumer needs the service account credentials to authenticate. The diagram below illustrates the general architecture of how IAP authenticates API calls to App Engine services using service accounts.

In order to make a request to the IAP-authenticated resource, the consumer generates a JWT signed using the service account credentials. The JWT contains an additional target_audience claim containing the OAuth2 client ID from the IAP. To find the client ID, click on the options menu next to the IAP resource and select “Edit OAuth client.” The client ID will be listed on the resulting page. My code to generate this JWT looks like the following:

This assumes you have access to the service account’s private key. If you don’t have access to the private key, e.g. because you’re running on GCE or Cloud Functions and using a service account from the metadata server, you’ll have to use the IAM signBlob API. We’ll cover this in a follow-up post.

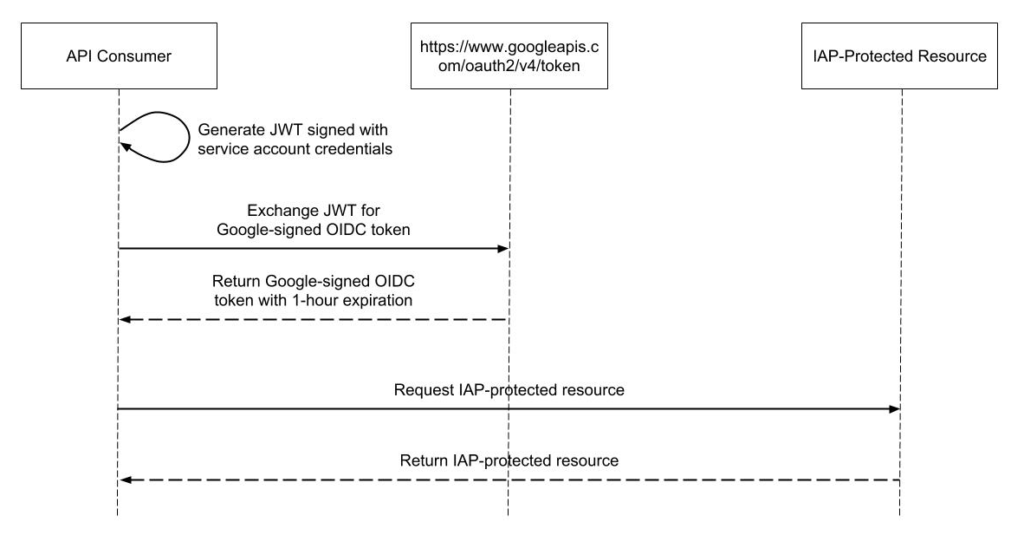
This JWT is then exchanged for a Google-signed OIDC token for the client ID specified in the JWT claims. This token has a one-hour expiration and must be renewed by the consumer as needed. To retrieve a Google-signed token, we make a POST request containing the JWT and grant type to https://www.googleapis.com/oauth2/v4/token.

This returns a Google-signed JWT which is good for about an hour. The “exp” claim can be used to check the expiration of the token. Authenticated requests are then made by setting the bearer token in the Authorization header of the HTTP request:

Authorization: Bearer <token>

Below is a sequence diagram showing the process of making an OIDC-authenticated request to an IAP-protected resource.

Because this is quite a bit of code and complexity, I’ve implemented the process flow in Java as a Spring RestTemplate interceptor. This transparently authenticates API calls, caches the OIDC token, and handles automatically renewing it. Google has also provided examples of authenticating from a service account for other languages.

With IAP, we’re able to authenticate and authorize requests at the edge before they even reach our application. And with Cloud Audit Logging, we can monitor who is accessing protected resources. Be aware, however, that if you’re using GCE or GKE, users who can access the application-serving port of the VM can bypass IAP authentication. GCE and GKE firewall rules can’t protect against access from processes running on the same VM as the IAP-secured application. They can protect against access from another VM, but only if properly configured. This does not apply for App Engine since all traffic goes through the IAP infrastructure.

Alternative Solutions

There are some alternatives to IAP for implementing authentication and authorization for APIs. Apigee is one option, which Google acquired not too long ago. This is a more robust API-management solution which will do a lot more than just secure APIs, but it’s also more expensive. Another option is Google Cloud Endpoints, which is an NGINX-based proxy that provides mechanisms to secure and monitor APIs. This is free up to two million API calls per month.

Lastly, you can also simply implement authentication and authorization directly in your application instead of with an API proxy, e.g. using OAuth2. This has downsides in that it can introduce complexity and room for mistakes, but it gives you full control over your application’s security. Following our model of defense in depth, we often encourage clients to implement authentication both at the edge (e.g. by ensuring requests have a valid token) and in the application (e.g. by validating the token on a request). This way, we avoid implementing a Death-Star security model.