Ingress on Google Kubernetes Engine (GKE) uses a Google Cloud Load Balancer (GCLB). GCLB provides a single anycast IP that fronts all of your backend compute instances along with a lot of other rich features. In order to create a GCLB that uses HTTPS, an SSL certificate needs to be associated with the ingress resource. This certificate can either be self-managed or Google-managed. The benefit of using a Google-managed certificate is that they are provisioned, renewed, and managed for your domain names by Google. These managed certificates can also be configured directly with GKE, meaning we can configure our certificates the same way we declaratively configure our other Kubernetes resources such as deployments, services, and ingresses.
GKE also supports Identity-Aware Proxy (IAP), which is a fully managed solution for implementing a zero-trust security model for applications and VMs. With IAP, we can secure workloads in GCP using identity and context. For example, this might be based on attributes like user identity, device security status, region, or IP address. This allows users to access applications securely from untrusted networks without the need for a VPN. IAP is a powerful way to implement authentication and authorization for corporate applications that are run internally on GKE, Google Compute Engine (GCE), or App Engine. This might be applications such as Jira, GitLab, Jenkins, or production-support portals.
IAP works in relation to GCLB in order to secure GKE workloads. In this tutorial, I’ll walk through deploying a workload to a GKE cluster, setting up GCLB ingress for it with a global static IP address, configuring a Google-managed SSL certificate to support HTTPS traffic, and enabling IAP to secure access to the application. In order to follow along, you’ll need a GKE cluster and domain name to use for the application. In case you want to skip ahead, all of the Kubernetes configuration for this tutorial is available here.
Deploying an Application Behind GCLB With a Managed Certificate
First, let’s deploy our application to GKE. We’ll use a Hello World application to test this out. Our application will consist of a Kubernetes deployment and service. Below is the configuration for these:
Apply these with kubectl:
$ kubectl apply -f .
At this point, our application is not yet accessible from outside the cluster since we haven’t set up an ingress. Before we do that, we need to create a static IP address using the following command:
$ gcloud compute addresses create web-static-ip --global
The above will reserve a static external IP called “web-static-ip.” We now can create an ingress resource using this IP address. Note the “kubernetes.io/ingress.global-static-ip-name” annotation in the configuration:
Applying this with kubectl will provision a GCLB that will route traffic into our service. It can take a few minutes for the load balancer to become active and health checks to begin working. Traffic won’t be served until that happens, so use the following command to check that traffic is healthy:
$ curl -i http://<web-static-ip>
You can find <web-static-ip> with:
$ gcloud compute addresses describe web-static-ip --global
Once you start getting a successful response, update your DNS to point your domain name to the static IP address. Wait until the DNS change is propagated and your domain name now points to the application running in GKE. This could take 30 minutes or so.
After DNS has been updated, we’ll configure HTTPS. To do this, we need to create a Google-managed SSL certificate. This can be managed by GKE using the following configuration:
Ensure that “example.com” is replaced with the domain name you’re using.
We now need to update our ingress to use the new managed certificate. This is done using the “networking.gke.io/managed-certificates” annotation.
We’ll need to wait a bit for the certificate to finish provisioning. This can take up to 15 minutes. Once it’s done, we should see HTTPS traffic flowing correctly:
$ curl -i https://example.com
We now have a working example of an application running in GKE behind a GCLB with a static IP address and domain name secured with TLS. Now we’ll finish up by enabling IAP to control access to the application.
Securing the Application With Identity-Aware Proxy
If you’re enabling IAP for the first time, you’ll need to configure your project’s OAuth consent screen. The steps here will walk through how to do that. This consent screen is what users will see when they attempt to access the application before logging in.
Once IAP is enabled and the OAuth consent screen has been configured, there should be an OAuth 2 client ID created in your GCP project. You can find this under “OAuth 2.0 Client IDs” in the “APIs & Services” > “Credentials” section of the cloud console. When you click on this credential, you’ll find a client ID and client secret. These need to be provided to Kubernetes as secrets so they can be used by a BackendConfig for configuring IAP. Apply the secrets to Kubernetes with the following command, replacing “xxx” with the respective credentials:
$ kubectl create secret generic iap-oauth-client-id \
--from-literal=client_id=xxx \
--from-literal=client_secret=xxx
BackendConfig is a Kubernetes custom resource used to configure ingress in GKE. This includes features such as IAP, Cloud CDN, Cloud Armor, and others. Apply the following BackendConfig configuration using kubectl, which will enable IAP and associate it with your OAuth client credentials:
We also need to ensure there are service ports associated with the BackendConfig in order to trigger turning on IAP. One way to do this is to make all ports for the service default to the BackendConfig, which is done by setting the “beta.cloud.google.com/backend-config” annotation to “{“default”: “config-default”}” in the service resource. See below for the updated service configuration.
Once you’ve applied the annotation to the service, wait a couple minutes for the infrastructure to settle. IAP should now be working. You’ll need to assign the “IAP-secured Web App User” role in IAP to any users or groups who should have access to the application. Upon accessing the application, you should now be greeted with a login screen.

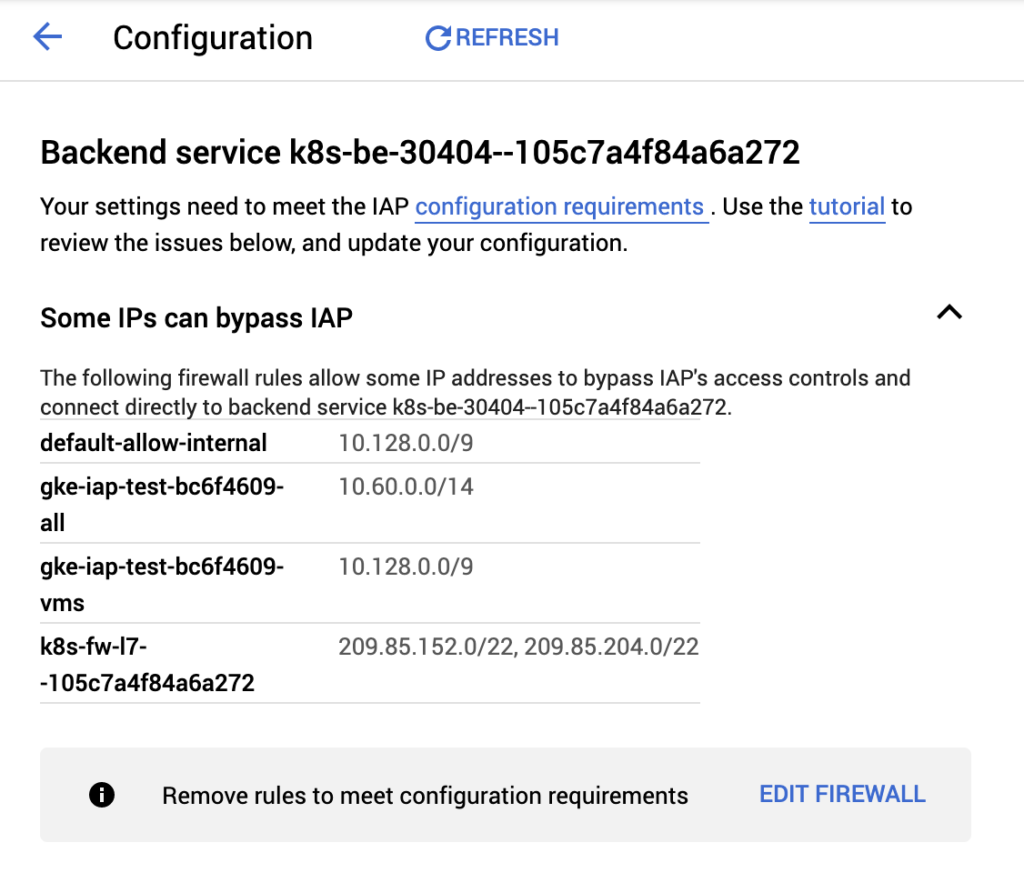
Your Kubernetes workload is now secured by IAP! Do note that VPC firewall rules can be configured to bypass IAP, such as rules that allow traffic internal to your VPC or GKE cluster. IAP will provide a warning indicating which firewall rules allow bypassing it.
For an extra layer of security, IAP sets signed headers on inbound requests which can be verified by the application. This is helpful in the event that IAP is accidentally disabled or misconfigured or if firewall rules are improperly set.
Together with GCLB and GCP-managed certificates, IAP provides a great solution for serving and securing internal applications that can be accessed anywhere without the need for a VPN.
Follow @tyler_treat
One Reply to “Using Google-Managed Certificates and Identity-Aware Proxy With GKE”