API Authentication with GCP Identity-Aware Proxy

Cloud Identity-Aware Proxy (Cloud IAP) is a free service which can be used to implement authentication and authorization for applications running in Google Cloud Platform (GCP). This includes Google App Engine applications as well as workloads running on Compute Engine (GCE) VMs and Google Kubernetes Engine (GKE) by way of Google Cloud Load Balancers.

When enabled, IAP requires users accessing a web application to login using their Google account and ensure they have the appropriate role to access the resource. This can be used to provide secure access to web applications without the need for a VPN. This is part of what Google now calls BeyondCorp, which is an enterprise security model designed to enable employees to work from untrusted networks without a VPN. At Real Kinetic, we frequently bump into companies practicing Death-Star security, which is basically relying on a hard outer shell to protect a soft, gooey interior. It’s simple and easy to administer, but it’s also vulnerable. That’s why we always approach security from a perspective of defense in depth.

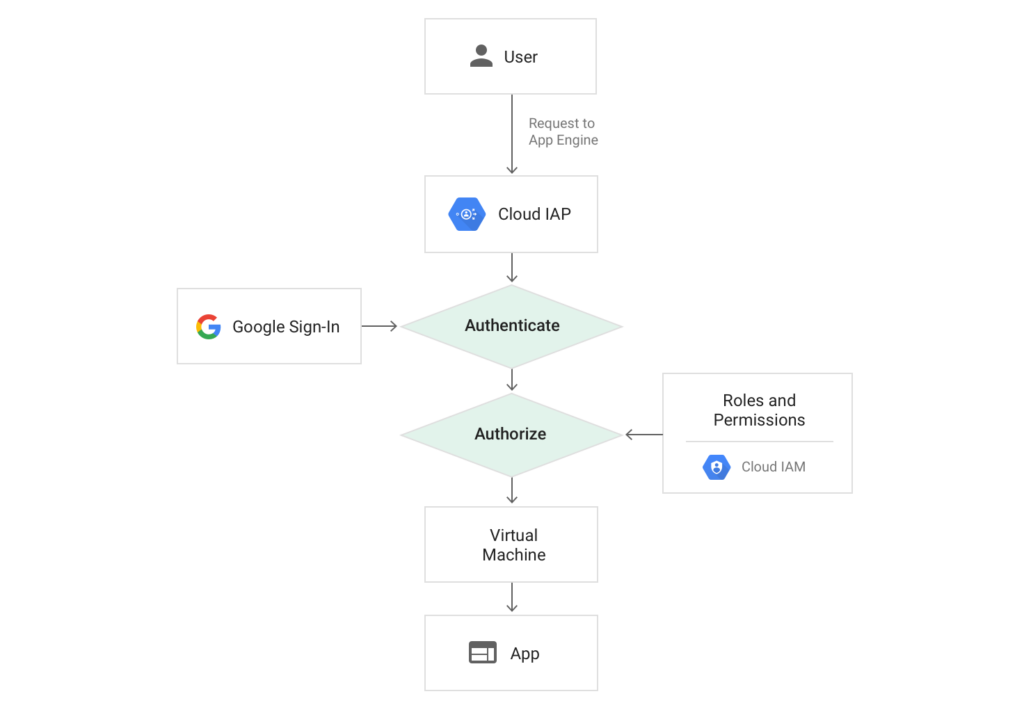
However, in this post I want to explore how we can use Cloud IAP to implement authentication and authorization for APIs in GCP. Specifically, I will use App Engine, but the same applies to resources behind an HTTPS load balancer. The goal is to provide a way to securely expose APIs in GCP which can be accessed programmatically.

Configuring Identity-Aware Proxy

Cloud IAP supports authenticating service accounts using OpenID Connect (OIDC). A service account belongs to an application instead of an individual user. You authenticate a service account when you want to allow an application to access your IAP-secured resources. A GCP service account can either have GCP-managed keys (for systems that reside within GCP) or user-managed keys (for systems that reside outside of GCP). GCP-managed keys cannot be downloaded and are automatically rotated and used for signing for a maximum of two weeks. User-managed keys are created, downloaded, and managed by users and expire 10 years from creation. As such, key rotation must be managed by the user as appropriate. In either case, access using a service account can be revoked either by revoking a particular key or removing the service account itself.

An IAP is associated with an App Engine application or HTTPS Load Balancer. One or more service accounts can then be added to an IAP to allow programmatic authentication. When the IAP is off, the resource is accessible to anyone with the URL. When it’s on, it’s only accessible to members who have been granted access. This can include specific Google accounts, groups, service accounts, or a general G Suite domain.

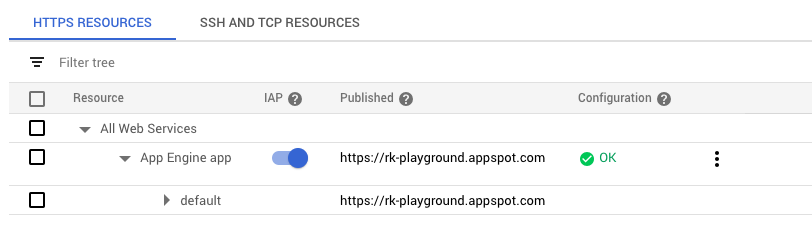
IAP will create an OAuth2 client ID for OIDC authentication which can be used by service accounts. But in order to access our API using a service account, we first need to add it to IAP with the appropriate role. We’ll add it as an IAP-secured Web App User, which allows access to HTTPS resources protected by IAP. In this case, my service account is called “IAP Auth Test,” and the email associated with it is iap-auth-test@rk-playground.iam.gserviceaccount.com.

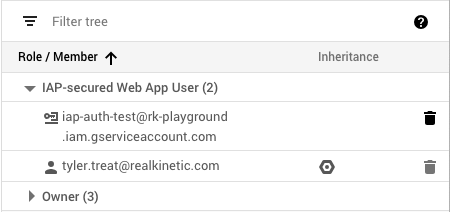
As you can see, both the service account and my user account are IAP-secured Web App Users. This means I can access the application using my Google login or using the service account credentials. Next, we’ll look at how to properly authenticate using the service account.

Authenticating API Consumers

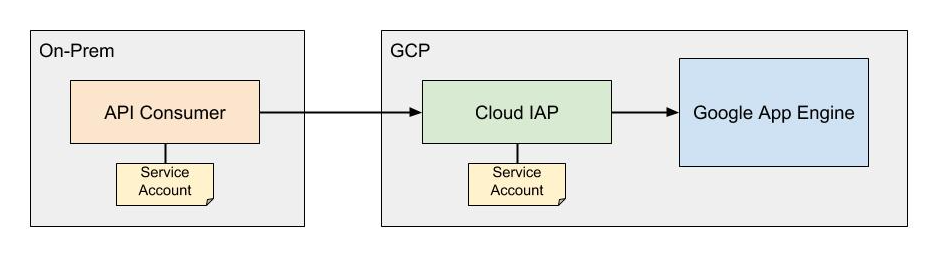
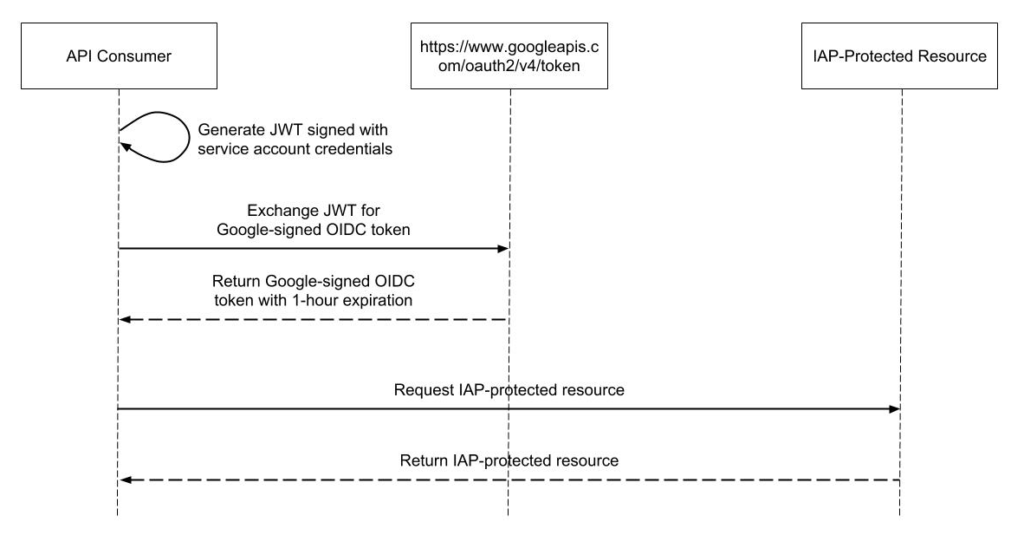
When you create a service account key in the GCP console, it downloads a JSON credentials file to your machine. The API consumer needs the service account credentials to authenticate. The diagram below illustrates the general architecture of how IAP authenticates API calls to App Engine services using service accounts.

In order to make a request to the IAP-authenticated resource, the consumer generates a JWT signed using the service account credentials. The JWT contains an additional target_audience claim containing the OAuth2 client ID from the IAP. To find the client ID, click on the options menu next to the IAP resource and select “Edit OAuth client.” The client ID will be listed on the resulting page. My code to generate this JWT looks like the following:

This assumes you have access to the service account’s private key. If you don’t have access to the private key, e.g. because you’re running on GCE or Cloud Functions and using a service account from the metadata server, you’ll have to use the IAM signBlob API. We’ll cover this in a follow-up post.

This JWT is then exchanged for a Google-signed OIDC token for the client ID specified in the JWT claims. This token has a one-hour expiration and must be renewed by the consumer as needed. To retrieve a Google-signed token, we make a POST request containing the JWT and grant type to https://www.googleapis.com/oauth2/v4/token.

This returns a Google-signed JWT which is good for about an hour. The “exp” claim can be used to check the expiration of the token. Authenticated requests are then made by setting the bearer token in the Authorization header of the HTTP request:

Authorization: Bearer <token>

Below is a sequence diagram showing the process of making an OIDC-authenticated request to an IAP-protected resource.

Because this is quite a bit of code and complexity, I’ve implemented the process flow in Java as a Spring RestTemplate interceptor. This transparently authenticates API calls, caches the OIDC token, and handles automatically renewing it. Google has also provided examples of authenticating from a service account for other languages.

With IAP, we’re able to authenticate and authorize requests at the edge before they even reach our application. And with Cloud Audit Logging, we can monitor who is accessing protected resources. Be aware, however, that if you’re using GCE or GKE, users who can access the application-serving port of the VM can bypass IAP authentication. GCE and GKE firewall rules can’t protect against access from processes running on the same VM as the IAP-secured application. They can protect against access from another VM, but only if properly configured. This does not apply for App Engine since all traffic goes through the IAP infrastructure.

Alternative Solutions

There are some alternatives to IAP for implementing authentication and authorization for APIs. Apigee is one option, which Google acquired not too long ago. This is a more robust API-management solution which will do a lot more than just secure APIs, but it’s also more expensive. Another option is Google Cloud Endpoints, which is an NGINX-based proxy that provides mechanisms to secure and monitor APIs. This is free up to two million API calls per month.

Lastly, you can also simply implement authentication and authorization directly in your application instead of with an API proxy, e.g. using OAuth2. This has downsides in that it can introduce complexity and room for mistakes, but it gives you full control over your application’s security. Following our model of defense in depth, we often encourage clients to implement authentication both at the edge (e.g. by ensuring requests have a valid token) and in the application (e.g. by validating the token on a request). This way, we avoid implementing a Death-Star security model.


Implementing Spring-like Classpath Scanning in Android

One of the things that Spring 2.5 introduced back in 2007 was component scanning, a feature which removed the need for XML bean configuration and instead allowed developers to declare their beans using Java annotations. Rather than this:

We can do this:

It’s a pretty simple idea since Java makes it very easy to introspectively check a class’s annotations at runtime through its reflection API. Spring’s component scan feature also allows you to specify the base package(s) to scan for beans.

The big question is how do we get access to the classes in the classpath, specifically, those in the desired package? Java SE doesn’t provide an API for doing it, but there are ways to accomplish this. The most common (if not the only) approach is to load classes by relying on the file system. We know that we can use the ClassLoader to load a class by its package-qualified name, so it becomes a matter of retrieving the file names.

Getting the classpath itself in Java SE is easy:

This will yield something that looks like “/Users/Tyler/Workspace/Test/bin:/Users/Tyler/Workspace/Test/lib/gson-2.1.jar”. Loading the files from here is pretty straightforward, as is filtering on the package name since it maps to a directory one-to-one.

Another similar approach is to use the ClassLoader to load the resources directly:

Transition to Android

Unfortunately, these solutions don’t lend themselves to Android, which made implementing classpath scanning a little more difficult for Infinitum. The reason for this is, more or less, because of the way Android’s Dalvik VM is designed. When an Android application is compiled, the Dalvik bytecode is packaged into a file called “classes.dex” inside the APK. The good news is that the Android SDK provides an API for interacting with DEX files through the DexFile class.

In order to access classes.dex, we need a handle on the APK itself, which is actually quite easy to do:

The above code opens a DexFile for the running APK. Of course, this can have some performance implications. Opening the DexFile will potentially cause the VM to pass classes.dex through a process known as “dexopt”, which is a program that performs bytecode verification and optimization. This is an expensive process, but since we’re opening a DexFile for the APK itself, classes.dex should have already undergone this process, meaning dexopt won’t be run again.

The DexFile gives us access to the classes contained in classes.dex as an enumeration of strings representing the package-qualified class names. With this, we can iterate over the class names and load any which match the desired package.

This gets the job done, and it’s essentially how Infinitum accomplishes component scanning. However, it’s a very expensive operation. DexFile.entries() yields every class in the classpath — that is, every class in classes.dex — which includes not just application binaries, but also those of any libraries included.

It’s great that we can introspect every class in the classpath, but if we’re only interested in classes of a particular package, we’re out of luck. Every class is compiled into classes.dex and, short of decompiling it ((Tools for decompiling DEX files exist, such as Baksmali, but doing such a thing at runtime — if it’s even possible — would arguably not gain you any performance benefits. Still, this is something worth exploring.)),  there’s no way to pull out the classes we want without iterating over the entire classpath.

So, for now we settle with this somewhat inefficient solution. Nonetheless, it accomplishes what it needs to at the cost of maybe a few hundred milliseconds ((On the emulator running on my MacBook Pro, the classpath scanning takes about 600 milliseconds, while on my Galaxy Nexus, it takes about 200 milliseconds.)), so maybe it’s not such a bad approach in the grand scheme of things.

A Look at Spring’s BeanFactoryPostProcessor

One of the issues my team faced during my time at Thomson Reuters was keeping developer build times down. Many of the groups within WestlawNext had a fairly comprehensive check-in policy in that, after your code was reviewed, you had to run a full build which included running all unit tests and endpoint tests before you could commit your changes. This is a good practice, no doubt, but the group I was with had somewhere in the ballpark of 6000 unit tests. Moreover, since we were also testing our REST endpoints, it was necessary to launch an embedded Tomcat instance and deploy the application to it before those tests could execute.

Needless to say, build times could get pretty lengthy. I think I recall, at one point, it taking as long as 20 minutes to complete a full build. If a developer makes three commits in a day, that’s an hour of lost productivity. Extrapolate that out to a week and five hours are wasted, so you get the idea.

Of course, there were things we could do to cut down on that time — disabling the Cobertura and Javadoc Ant tasks for instance — but that only gets you so far. The annoying thing was that you typically had a Tomcat server running with the application already deployed, yet the build process started up a whole other instance in order to run the endpoint tests.

I explored the possibility of having endpoint tests run against a developer’s local server (or any server, in theory) by introducing a new property to the developer build properties file. It seems like a pretty simple concept: if the property doesn’t exist, run the tests normally by starting up an embedded Tomcat server. If it does exist, then simply route the HTTP requests to the specified host. Granted, it’s not going to significantly reduce the build time, but anything helps.

Unfortunately, it was not that simple. That’s because we couldn’t just run endpoint tests against the “live” app. The underlying issue was that our API, which we called ourselves from JavaScript and was also exposed to other consumers, relied on some other WestlawNext web services, such as user authentication and document services. We weren’t doing end-to-end integration testing, we were just testing our API. As a result, we used a separate Spring context which allowed the embedded Tomcat hook to deploy the application using client stubs in place of the actual web service clients.

So, things started to look a little moot. A developer would have to start their Tomcat server such that the client stub beans were registered with the Spring context in place of the normal client bean implementations. At the very least, it presented an interesting exercise. It was especially interesting because the client stubs were not part of the application’s classpath, they were separate from the app’s source and compiled to a bin-test directory.

Introducing the BeanFactoryPostProcessor

The solution I came up with was to implement one of Spring’s less glamorous (but still really neat) interfaces, the BeanFactoryPostProcessor. This interface provides a way for applications to modify their Spring context’s bean definitions before any beans get created. In my case, I needed to replace the client beans with their stub equivalents.

We start by implementing the interface, which has a single method, postProcessBeanFactory.

So the question is how do we implement registerClientStubBeans? This is the method that will overwrite the client beans in the application context, but in order to avoid the dreaded NoClassDefFoundError, we need to dynamically add the stub classes to the classpath.

The addClasspathDependencies method will add the stubs to the classpath, while getClientStubBeans will do just as its name suggests. I’ve also created a Bean class that will hold a bean name and its BeanDefinition. In order to register beans with the BeanFactory, we use the registerBeanDefinition method and pass in a bean name and corresponding BeanDefinition.

Let’s take a look at how we can add the stubs to the classpath at runtime.

It looks like there’s a lot going on here, but it’s actually not too bad. The addClasspathDependencies method is simply going to call addToClasspath to add some classes we need, which include the stubs in bin-test but also some libraries they rely on in the libs directory. The more interesting code is in the latter of the two methods, which is responsible for taking a File, which will be a .class file, and adding it to the classpath. We do that by getting the context ClassLoader and then, using reflection, we invoke the method “addURL” by passing in the .class URL we want to add.

Lastly, we need to implement the getClientStubBeans method, which returns a list of the bean definitions we want to register with the context.

Again, it’s a lot of code, but it’s not difficult to follow if you take it piece by piece. The getClientStubBeans method is going to get the directory in which the stubs classes are located and pass it to buildBeanDefinitions. This method iterates over each file, extracts the file name (e.g. “com/foo/client/stub/WebServiceClientStub.class”) and converts it into a fully-qualified class name (e.g. “com.foo.client.stub.WebServiceClientStub”). Since we already added the stubs to the classpath, the class is then loaded by this name. Once the class is loaded, we can check if it is indeed a stub by introspectively looking for the ClientStub annotation (this custom annotation makes a bean eligible for auto-detection and specifies a bean name). If it is a stub, we use Spring’s handy BeanDefinitionBuilder to build a BeanDefinition for the stub.

Now, when Spring initializes, it will detect this BeanFactoryPostProcessor and invoke its postProcessBeanFactory method, resulting in the client stubs being registered with the context in place of their respective implementations. It’s a pretty unique use case (and, frankly, not particularly useful for the given scenario), but it helps illustrate how the BeanFactoryPostProcessor interface can be leveraged.